
Overview
In Visual Attributed String, you create NSAttributedStrings for your iOS and OS X applications by simply writing text and applying effects to words and paragraphs in the document like you would in any word processing application. Visual Attributed String automatically generates the Swift or Objective-C code required to programmatically create text that you edit visually. Therefore, you can save hours of work by visually editing text, as opposed to hand writing the code required to render NSAttributedStrings on screen.
Why You Should Use Visual Attributed String:
Avoid Trial & Error When you hand code NSAttributedStrings, you have to make strategic guesses as to which attributes to use and what values to apply to each attribute. You do not get a visual representation of your work until you run your application. If you are not satisfied with the results of a programmatically created NSAttributedString, then you have to stop your application and try again. Visual Attributed String takes this pain away because you instantly see the results of your work.
Creating Long NSAttributedStrings with Different Attributes is Time-Consuming, and Hard Many applications need to display large bodies of text with different fonts, colors, and text-effects that should only be applied to certain words. For long bodies of text, developers may be tempted to create separate labels for each word with unique text attributes to avoid dealing with the headaches involved with applying unique attributes to a certain range of characters in a single label or text view. However, when a developer creates separate labels for each word, he now has to deal with the headaches involved with placing separate labels in their proper positions on screen. Therefore creating separate labels for words with differing attributes is merely shifting the workload from one task to another.
Rapidly Mock-Up Application User Interfaces in Visual Attributed String and Get the Code Required to Jump Right into Development! NSAttributedString’s usefulness is not exclusive to text view and label objects. In fact, NSAttributedStrings can also be used to style buttons, menu items, to customize the look of table views, and much more. Using Visual Attributed String, you can quickly accomplish these tasks by mocking-up significant portions of your app’s user-interface. One significant advantage of mocking up your application’s user interface in Visual Attributed String (as opposed to an alternative application) is that Visual Attributed String generates the Swift or Objective-C code for you, allowing you to quickly jump right into development!
Visual Attributed String Generates Platform-Specific Code Visual Attributed String generates Swift and Objective-C code that can be used in both iOS and Mac applications. You can easily select your desired platform in Visual Attributed String’s user interface.
Visual Attributed String is Easy and Fun! Editing text and attributes in the Visual Attributed String app is easy, quick, and fun! To get more help, click on the topics in the sidebar.
Creating New Documents:
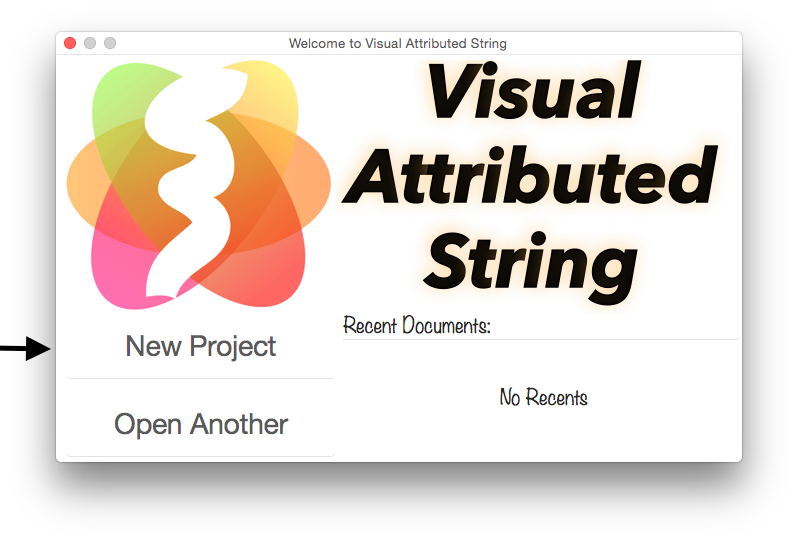
Creating new documents in Visual Attributed String is easy. Simply open the application and click the “New Project” button in the welcome window.
Opening Existing Documents:
Opening existing documents in Visual Attributed String is just as easy as creating new documents. Simply click on a saved .vas document file in the Finder and the application will launch. Alternatively you can click on the “Open Another” button in the Visual Attributed String’s welcome window (as displayed in the image above). When you click the “Open Another” button a panel will appear, allowing you to search for and select a .vas file in the Finder.
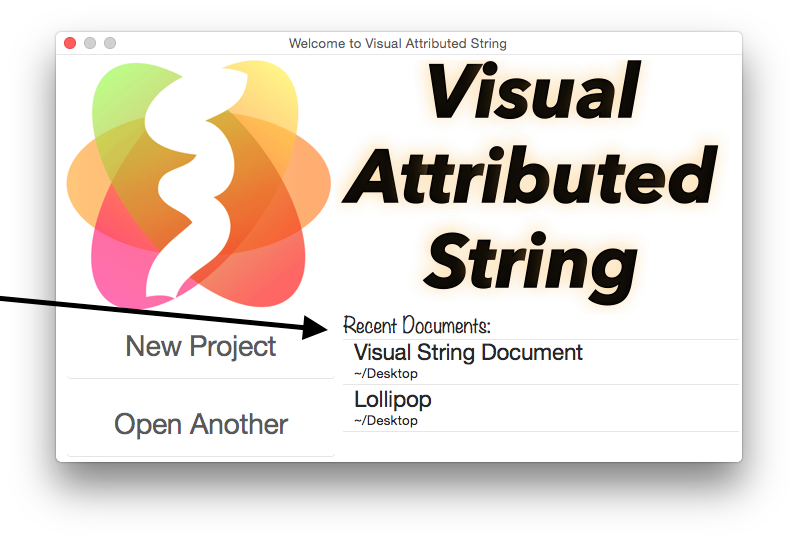
You can also open a recently opened document from the “Recent Documents” list displayed in the welcome window:
Formatting Documents:
Nearly all text formatting in Visual Attributed String is done by using the controls in the sidebar. Since the main goal of the Visual Attributed String application is to allow developers to design their NSAttributedString’s for iOS and Mac applications, practically all controls in the sidebar explicitly indicate what type of visual effect their values will have on text (rather than relying on ambiguous icons).
Changing Fonts
Indenting Paragraphs:
To indent paragraphs, simply select the text you want to indent and navigate to the “indents” section underneath “Paragraph Style” in the sidebar. To indent an entire paragraph by 50 points on the left and the right sides simply: 1) Give the “First” indent field a value of 50. 2) Give the “Head” indent field a value of 50. 3). Give the “Tail” indent field a value of -50.
The result will look like this:

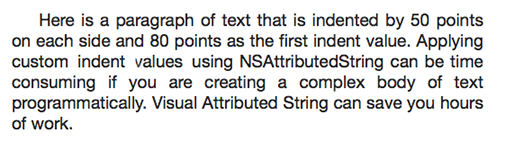
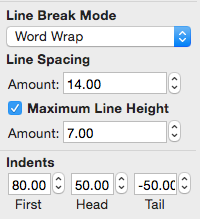
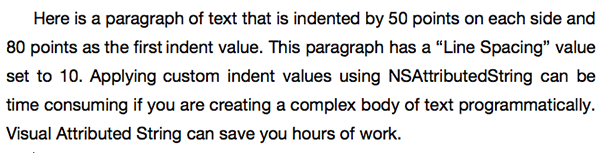
To indent the first line in a paragraph by a larger margin than the other lines, you can give the “First Indent” field a larger value that the “Head” and “Tail”. For example: the paragraph below gives has a “First Indent” value of 80, while the “Head Indent” is 50 and the “Tail Indent” is -50.
 Changing Line Spacing
Modifying the line-height of NSAtttributedString’s is easy to do in the Visual Attributed String application. Simply select text and change the line “Line Spacing” in the sidebar. Below you can see the results of a sample paragraph with a “Line Spacing” value of 10.
Note: Line Spacing cannot be set to a negative number. To make lines of text appear closer to each other, you must click the “Maximum Line Height” checkbox and then you can set a custom “Maximum Line Height” value. By default, there is no maximum line height applied to text in NSAttributedStrings; the line height of text is inferred by the font and font size that is being used. When you turn on maximum line height you can adjust this value to make lines of text appear “closer” to each other. However, if you set the “Maximum Line Height” value to a number that is too small for the font size being used, the text can appear to be clipped.
Styling Text
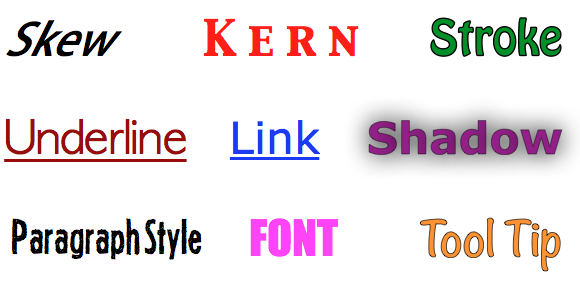
Styling text in Visual Attributed String is easy. Simply select the text you want to style and change the values of the attributes you want to edit in the sidebar. In Visual Attributed String you can set many of NSAttributedString’s attribute values in the visual editor. Some of the attributes you can adjust in the Visual Attributed String application are listed below:
Adding Images
NSAttributedStrings can also be used to display images inline with text by using NSTextAttachment objects. Visual Attributed String allows you to add images to your NSAttributedString objects visually. To add a image to a Visual Attributed String document, simply drag and drop an image from Finder onto the window.

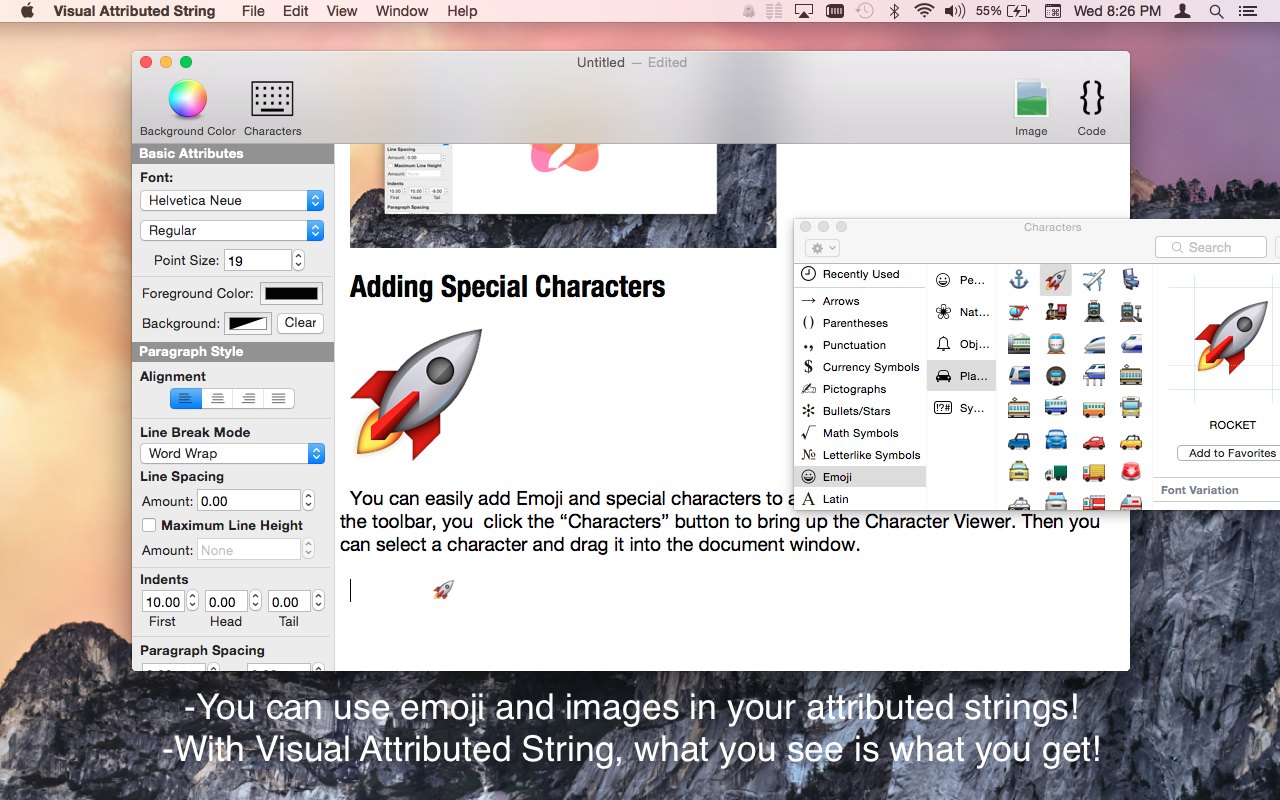
Adding Special Characters
You can easily add Emoji and special characters to a Visual Attributed String document. In the toolbar, you click the “Characters” button to bring up the Character Viewer. Then you can select a character and drag it into the document window.
Generating Code
There are two ways to generate code in Visual Attributed String. The first way lets you get code for the entire document and the second way lets you get code for specific areas of text. When you are ready to generate the code for your NSAttributedString objects, you can either:
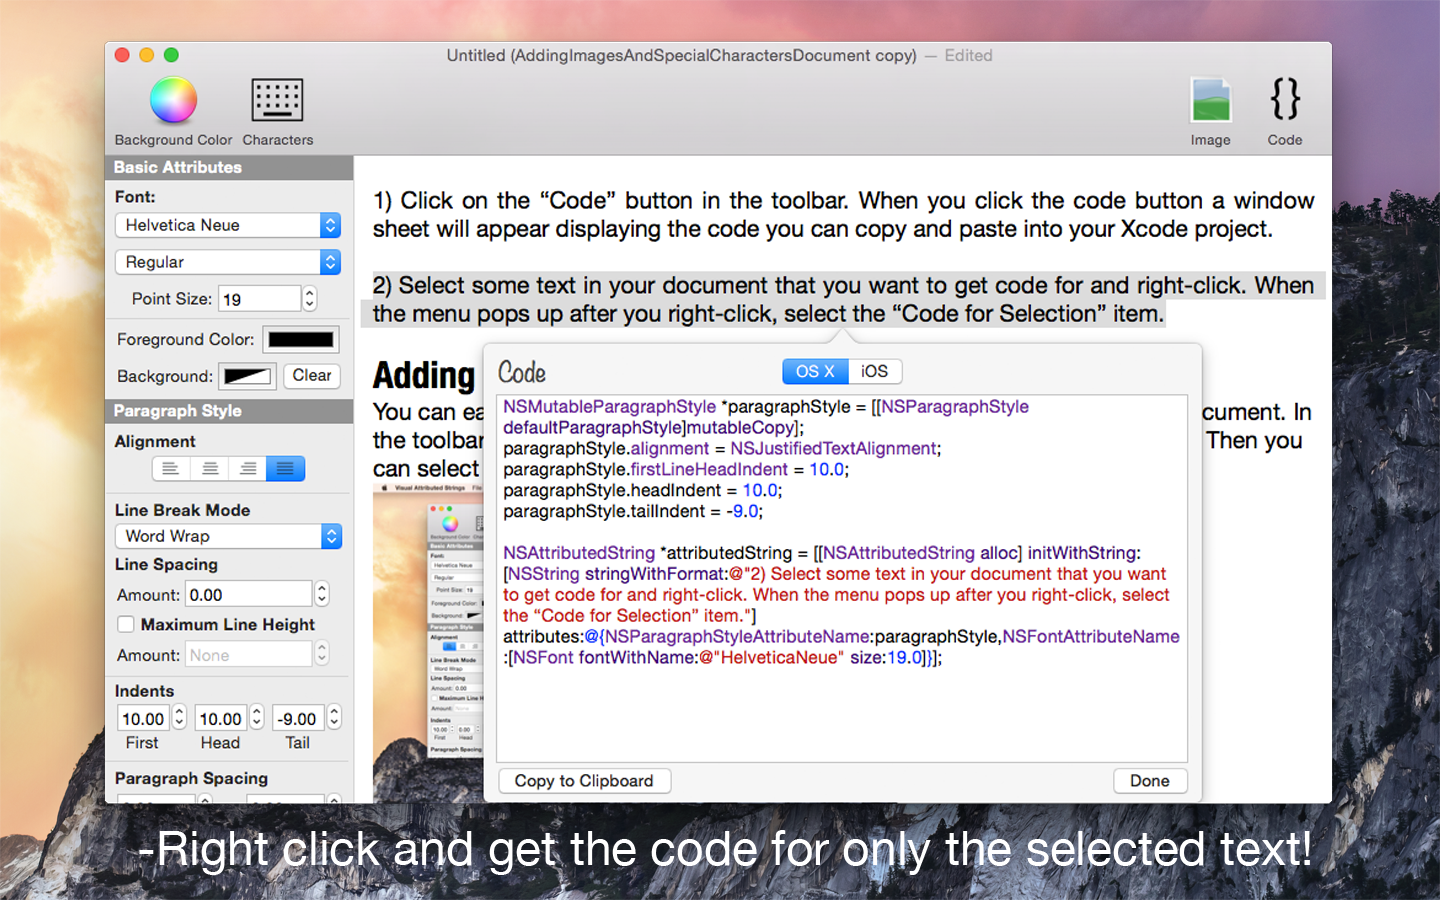
1) Click on the “Code” button in the toolbar. When you click the code button a window sheet will appear displaying code you can copy and paste into your Xcode project.
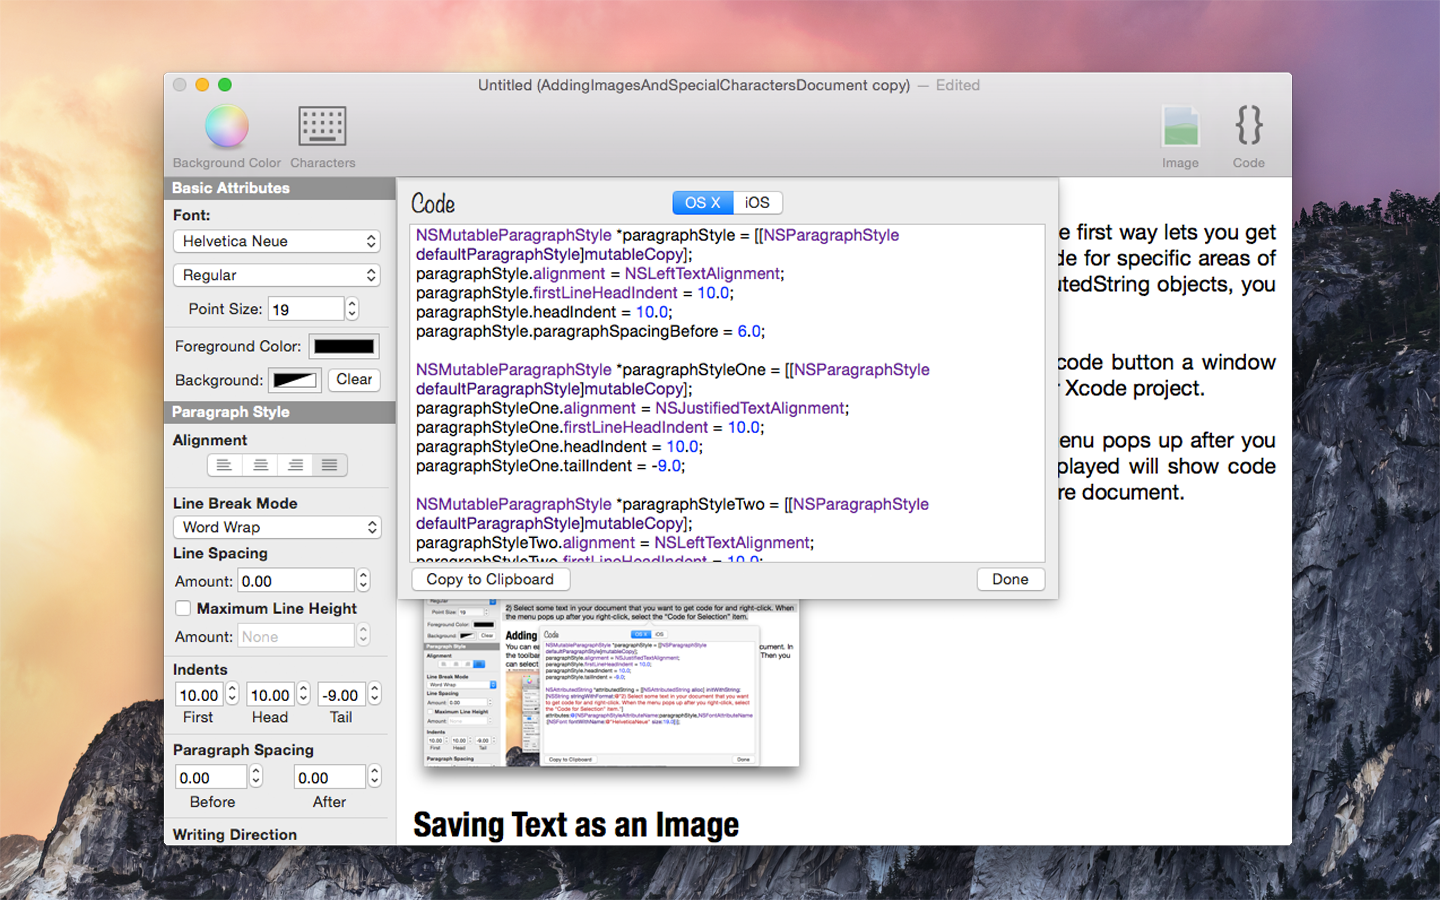
2) Select some text in your document and right-click. When the menu pops up after you right-click, select the “Code for Selection” item. The popover displayed will show code only for the selected text, as opposed to code representing the entire document.
Troubleshooting Issues
Visual Attributed String provides a way for iOS and Mac developers to visually design NSAttributedString objects by simply typing and styling text like you would in a word processing application. While Visual Attributed String reduces much of the developer’s workload, there are still a few mistakes that you can make even when using Visual Attributed String. This section describes some common problems you may run into and how you can easily fix those problems.
My iOS Application Won’t Run After Pasting Code Generated from Visual Attributed String into Xcode You must make sure that the “iOS” segment is selected in the user interface before copying code from Visual Attributed String into an iOS project. While NSAttributedString objects are available in both the iOS and OS X SDK, there are still minor differences in the API. For iOS projects, you must make sure you copy and paste the iOS specific code. Likewise, for Mac projects you also must make sure you do not accidently paste code generated for iOS.
My iOS Application Crashes When Using Code Generated from Visual Attributed String Your iOS application will crash if you used a font in Visual Attributed String that does not come with the iOS SDK. If you want to use a custom font in your iOS application, you must add the font file as a resource to your Xcode project. Then after you have added the font file go to the Info.plist of your Xcode project and add your font as a entry in the “Fonts provided by Application” array.
Link Attribute Does Not Work If you are using an NSAttributedString within a UITextView, you need to set the text view’s delegate and implement the textView:shouldInteractWithURL:inRange: method. Certain text objects and controls on iOS and OS X require additional configuration for link attributes to work. You can check Apple’s documentation for more details.
Tool Tip Attribute Not Generated in the iOS Code NSToolTipAttributeName is only available on OS X. When Visual Attributed String generates code for iOS, it is smart enough to not include this attribute in the code.
Images Do Not Show Up If you added images to your Visual Attributed String document and they do not show up when you use the generated code, it probably means that you did not add the images to your Xcode project. For example, if you dragged in an image named: MyImage.png into your Visual Attributed String document, you need to add the MyImage.png to your Xcode project as a resource. If you changed the image’s name in your Xcode project after generating the code, you will have to manually edit the code so the image names match. Alternatively, you could delete the image from your Visual Attributed String document, re-add it with the new image name, and regenerate the code.